Sunday, September 19, 2010

Using git submodules to share a backend library between two local repositories

Acknowledgements
The following knowledge about git submodule usage has been achieved from on-site training with Adam Dymitruk. (Also, be sure to check out Adam's article in Code Magazine: Git from a Developer's Perspective.)

What scenario is this blog entry meant to address?
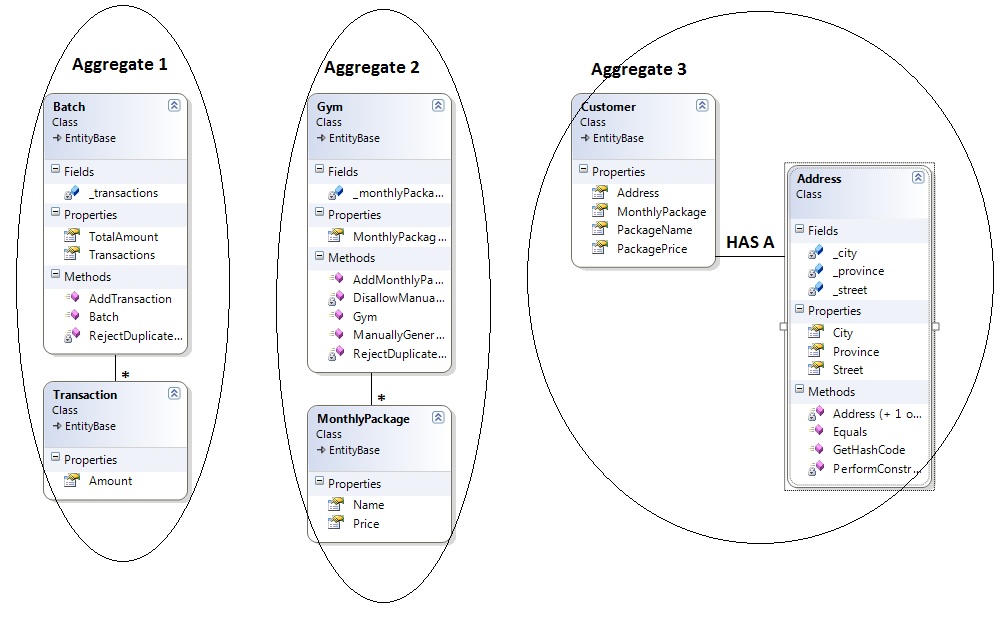
This blog entry addresses the common scenario where multiple web, Windows, Silverlight, console, or other clients all reference a common set of backend libaries. The backend libraries would contain the domain model, repository layer, utils, external gateway references, and so on.

Why git submodules?
git submodules present a distinct advantage over other methods for referencing backend libraries. Let's look at some of the alternate approaches generally used.

Approaches for referencing backend libraries from multiple clients
  • Referencing compiled DLLs (via file directory or GAC).
  • Referencing a web proxy (where backend libraries are deployed via a web services layer).
  • Referencing the .csproj files from a single location in your file directory
  • Referencing the .csproj files from multiple locations (one per local git repository)
This last approach uses git submodules.

Let's have a more detailed look at each approach:

Referencing compiled DLLs
In this case, you treat the backend libraries as a somewhat fixed SDK, much as you might treat a 3rd party library. In debug mode, your breakpoints end at the boundary of the compiled DLL.

Referencing a web proxy
You build a Remote Facade over the domain, in which all possible domain interactions are encapsulated in coarse-grained service methods. You then expose this layer as web services, and in your clients, create web services proxies, which you then reference. In debug mode, your breakpoints end at the boundary of the web service proxy.

Referencing the .csproj files from a single location in file directory
You wish to debug right from the client through to the backend, so you reference your backend libraries in two distinct ways:
  • In standard fashion, you have a solution file for the backend libraries themselves, within the enclosing folder. This solution also includes various unit/integration test projects for building / validating your backend libraries.
  • However, your external clients ALSO reference one or more of the library/projects as .csproj files, within your local client solution file.
This last solution provides the benefit of pass-through debugging, but it quickly presents an obvious problem: you have multiple clients, in different stages of development. What if one client needs 'release 1.8' version of the backend libraries, but another client needs 'release 2.0' version of the backend libraries? (And that's not even getting into hot fixes!)

Which brings us to the 4th approach:

Referencing the .csproj files from multiple locations (one per local git repository)
The following diagram demonstrates the file directory configuration for this approach:

 
In this last scenario, each local git repository (a grouping of client projects, based on some common organizing principle determined by your organization) has a local copy of the backend libaries stored WITHIN that local repository. The benefit provided is that each copy of the backend libaries can  exist in a different state (i.e. at a different point in the git commit history, pointing at a different branch.)

Here's what that might look like for you on some future Tuesday at work:
  • In the morning, you are working on the SilverlightClientApps local repository, on ClientApp2. For this you require the backend libaries in release1.8 branch.
  • In the afternoon, you are working on the WebClientApps local repository, on ClientApp5. for this you require the backend libraries in hotfix_2010Oct branch.
And even that scenario is keeping it very simple--there's no reason you can't create a local branch of the backend libary to make some custom changes as you go--but lets start with the simple scenario, for now.

Steps to setup a git submodule
Let's assume you are starting by installing git. We'll then make 3 local libaries: WebApps, WinApps, and BackendLibaries. We'll turn each one into a git repository, store them all in a fake local server (which is good enough for our purposes at the moment), and then setup additional local copies of the BackendLibaries as submodules with distinct commits, in each local repository (i.e. WebApps and WinApps).

Do the following:
  • Install git if you don't have it already installed.
  • Launch GitBash.
  • Create a local directory called /c/dev/
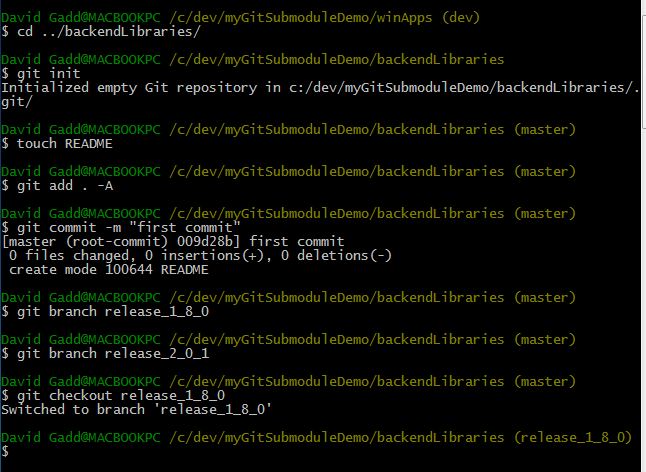
  • As per the following screenshot, set up myGitSubmoduleDemo with 3 subdirectories for webApps, winApps, and backend Libraries
 
  • Go to the webApps subdirectory, and set it up as a local git repository, with a single commit, and set to the dev branch:
 
  • Repeat for the winApps directory
  • And finally, repeat for the backendLibraries, but with 2 release branches
 
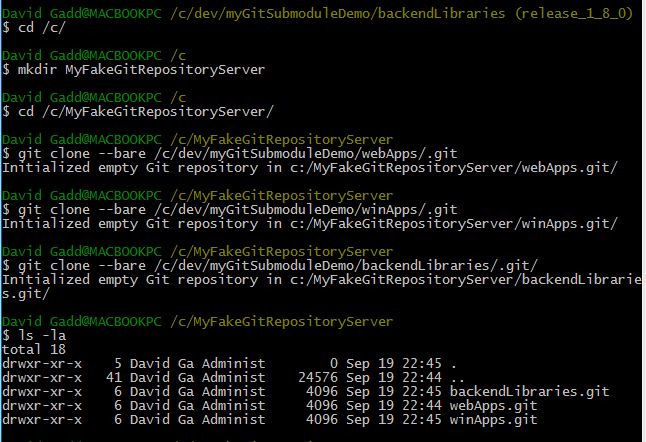
  • Next: you need to set up all 3 local repositories as server repositories. In this example, you simply create a local directory at /c/MyFakeGitRepositoryServer/, and make a bare clone of each local repository in this location.
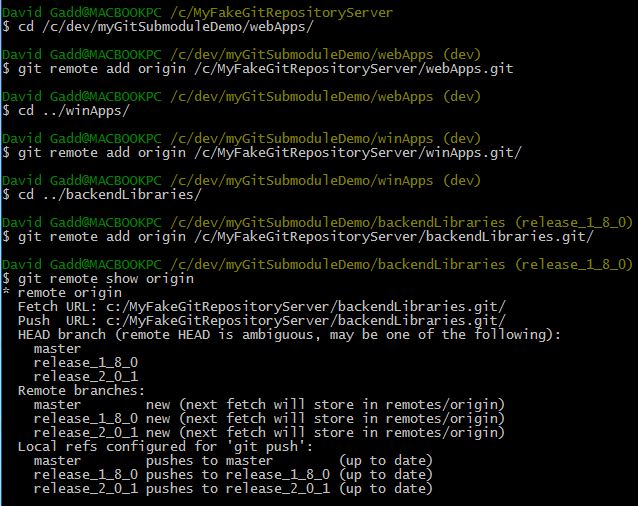
  • Now return to your local repositories, and use the "git remote add origin" command to connect your local repository to each server repository

  • Congratulations! You are now ready to create a submodule within each client repository (webApps and winApps). Let's start by creating the submodule within webApps

  • Note that in the last step, you change directory from the outer directory, "webApps" to the inner directory (the submodule) "backendLibraries". Notice that these directories are in completely different branches. Other than relative placement, they are INDEPENDENT. You can edit either the outer client repository or the inner submodule, you could add commits to either one, change branches, or do any other git action should you choose; but these are independent local repositories, and your actions in each are separate and independent.
  • Now let's repeat the above steps for the "winApps" local repository:
 
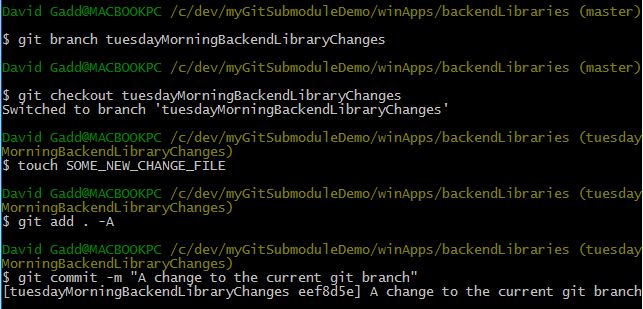
  • And finally, just to make the point perfectly clear: let's make a NEW branch on this copy of backendLibraries, add a new file within this branch, and commit it:

  • Note that this new branch is on the backendLibraries submodule, WITHIN winApps. The enclosing local repository winApps is unchanged (still within dev branch). Go up one level to the winApps branch, and type "git status" to check your status.

  • The git status commands does observer some changes, but these are all EXTERNAL changes, about the submodule itself: it sees that a submodule has been added (along with a .gitmodules configuration file); and it can tell that backendLibaries has been modified. But it knows nothing about the changes within the backendLibraries submodule, because that is not within its scope. You are now managing, two, separate local repositories, one of which happens to be nested as a submodule within the other.
Conclusion
Does having two, independent copies of the backendLibaries in each local repository remind you of anything? It should: this scenario is indistinguishable from having two developers, on two separate machines doing branching, commits, merges, and checkins (git push) on local copies of backendLibraries. It just happens that in this case, those two local developers are both YOU: you, in the morning, working on some webApps and the backendLibraries submodule within webApps; and you, in the afternoon, working on some windowsApps and the backendLibraries submodule within windowsApps.

In conclusion, the main benefits of git submodules (as implemented in the above scenario) are twofold:
  1. You can use direct .csproj references to your backend Libraries in your client apps.
  2. You can maintain independent (and diverging) branches of those backend Libraries in each local git repository that you configure with a backendLibraries submodule.

    Saturday, August 28, 2010

    Combining TDD kata with git branching and merging

    I've been learning from Adam Dymitruk recently how to do git branching and merging from the command line. I thought I would codify some of this in a blog post. Since I also am interested in TDD kata, I'm going to try combining the two into a shared TDD/git kata.

    To do this, I'll take the first couple of tests from Roy Osherove's Calcualtor kata, and combine them with the practice of git branching and merging. You really don't want to do this unless you already have some comfort with doing Calculator kata; if you are new to the Calculator kata (or to TDD generally) this git configuration will only prove to be a distraction.

    However, if you are already comfortable doing the Calculator kata, and want to work on git branching and merging, this will provide some practice.

    This blog entry assumes you have the following installed:
    * git and the GitBash command-line tool
    * Visual Studio 2008 or 2010
    * Resharper

    This WON'T assume you have access to a git repository on a server, we will fake a "git repo server" on your local hard drive instead.

    Setup
    1) On your local drive, create a folder to represent your fake git repo server, named something like:
    • c:\FakeGitRepoServer
    2) Add a .gitignore file to the root of this directory. The .gitignore file instructs git which configuration files can be ignored/not stored in git. You can create one from this StackOverflow discussion thread. Paste the contents into NotePad, and then save it as c:\FakeGitRepoServer\.gitignore
    NOTE   You don't NEED it here for the repository. This is just a convenient place to store it. You'll be copying into each project folder as part of your git configuration.
    3) Launch Visual Studio 2008/10 and create a new solution named "TDDKata_Calcuator_2010Aug28" with two class libraries:
    • MyCompName.Kata.Domain
    • MyCompName.Kata.Tests.Unit
    3) Add a reference to NUnit.Framework (in the tests project).

    4) Launch GitBash.

    5) Use the cd command to change to your solution directory. For this blog entry, let's assume that location is:
    • c:\SourceCode\dotNet\TDDKata_Calculator_2010Aug28\
    NOTE    The examples in this blog post use relative pathing to move around. Some people find this tiresome. If you'd like a simple alternative, you can specify your paths from the drive root. For example, assuming you are using the C: drive, you could use commands such as:
    • cd /c/SourceCode/dotNet/TDDKata_Calculator_2010Aug28
    6) Any new folder that isn't yet set up for git must first be initialized for git. Type: "git init"


    You'll observe that the path now includes a branch name, "master" in brackets at the end of the path. In this git/TDD kata, we'll be creating additional branches: a permanent branch named "development", and any number of temporary, feature branches, with names like "myFirstTest". These branches will be merged back into the development branch and discarded as each minor feature reaches a relative degree of solidity (the test passes) and we are ready to move on. No matter how many temporary feature branches we create, we will always return back to (and merge into) the development branch.
    NOTE   At the very end of the kata, we will merge the development branch back into the master branch. This is analagous to deployment to production.
    NOTE   For a definitive article on git branching for team development, see the article A Successful Git Branching Model.
    8) But first things first: Let's get a local copy of our .gitignore file, something we should always do immediately after initializing the folder. To copy the .gitignore file from the folder where you stored it earlier to your current folder, type:
    • cp ../../../FakeGitRepository/.gitignore .


    9) Now that git knows which files to ignore, let's have a look at your current situation. Type 'git status'


    10) From here, going forward, for basic git checkin, you will use the same 4 git commands over and over:
    • git status  // this updates you on the file status
    • git add . -A    // this adds the files to be tracked
    • git commit -m "my comment" // this commits the file
    • git push  // this moves the commit to the remote repository
    11) Let's start by adding the files:


    11) Now let's commit those files:


    12) At this point, you need to push these files to the git remote repository on the server--but we haven't set that up yet! To do this, change directory to the c:\FakeGitRepoServer:
    cd ../../../FakeGitRepository
    13) In that directory, create an empty copy (a "bare clone") of your local git directory. The syntax for this is:
    git clone --bare ../SourceCode/dotNet/TDDKata_Calculator_2010Aug20/.git


    13) Now you can return to your local repository, set up a connection to the new remote repo, and push your files to that repo. To return to your local repository, type:
    cd ../SourceCode/dotNet/TDDKataCalculator_2010Aug28/
    14) Now, from your source directory, to set up a connection to your remote repository, enter:
    git remote add origin /c/FakeGitRepoServer/TDDKata_Calculator_2010Aug28.git

    15) As above, you can VIEW your remote settings with:
    git remote -v
    16) It took awhile to set up that repository--where were you before you started that? -- You were about to push your local commit to the remote repository. Let's do that now:
    git push origin master

    17) Congratulations--you have your Calculator kata started, and your first set of code changes have been:
    • committed
    • pushed to the master branch on the remote repository
    18) Now it's time to learn a little about branching. Our primary branch will be development, so we'll switch to that branch now. We only will merge back development into master branch at the very end of this kata (think of it as final release to production). Enter:
    git branch development
    git checkout development

    Excellent! Setup is complete, we're ready to begin the kata!

    TDD Calculator kata with branching and merging

    1) Create a new "feature" branch for your first test:
    git branch firstTest
    git checkout firstTest
    2) The git command line should now show that the current branch is firstTest:


    3) Switch to Visual Studio, and create your first test. Something like this:


    4) Use Resharper to create the Calculator class and move it to the Domain class libary; and get the test to pass.

    5) Now use the following 4 commands to  checkin your code to your feature branch:
    git add . -A
    git commit -m "First test created and passes"
    git push origin firstTest
    git status
    6) Note that when you push your code to the remote repository, that you are pushing it to a parallel branch (firstTest) in the remote repository. This is created on the fly by git if it doesn't already exist.

    7) Go back to Visual Studio and run your test again, it should pass.

    8) Now return to git, and switch to the development branch:
    git checkout development
    9) When you return to Visual Studio, you will be asked to Reload screens. Do so.

    10) Try running your test. Note that the code has disappeared! This is because the code exists only in your firstTest feature branch at the moment. Since you know the code is solid (the test is passing), it is safe to merge it back to dev. Let's do so:
    git merge firstTest

    11) Your changes are now merged. Switch to Visual Studio, and reload. (If Visual Studio seems confused about folders or .csproj files, just close and re-open the solution).

    12) You should now be able to run your first test while in the development branch; in other words, you have confirmed that the merge was successful.

    13) You don't need the feature branch anymore, so delete it:
    git branch -d firstTest

    14) Would you really create and delete a feature branch for a single test? Probably not; you'd probably do a series of tests to flesh out the feature, then merge them, then delete the feature branch. But the purpose, as always, with a kata is to get comfortable practicing a process and making it intuitive. So let's proceed to create a temporary feature branch for the next for kata tests.

    15) Create a new feature branch named secondTest.
    git branch secondTest
    git checkout secondTest

    16) Switch back to Visual Studio, and create your second test, something like:
    17) Once again, modify your code until the test passes.

    18) Once again, run the following 4 commands to checkin your code and push it to the remote repository (under the feature branch secondTest):

    git add . -A
    git commit -m "Second test created and passes"
    git push origin secondTest
    git status

    18) Once again, go to git and checkout the development branch:
    git checkout development
    19) Once again, return to Visual Studio and note that your second test has disappeared.

    20) Once again, return to git and merge the branches. (This time, try adding the tag --no-ff, which stands for no-fast-forward. This leaves a little more merge history in your record to view later as necessary):
    git merge secondTest --no-ff

    21) Once again, go to Visual Studio and confirm that your second test is running (i.e. has been merged) within the development branch.

    22) And finally, once again, delete the feature branch secondTest since you no longer need it:
    git branch -d secondTest
    23) Continue creating feature branches for several more tests. When you are done, as your final step, checkout the master branch, and merge all the changes your have made in the development branch to the master branch.

    Conclusion
    In this kata you have been familiarizing yourself with the process for combining the TDD process with the git feature branching and merging process.

    The key takeaway is the understanding of using git branching as a dynamic process for development, which can be learned effectively as part of working through a TDD kata process that you are already familiar with.

    Sunday, July 25, 2010

    TDD Brownfield example: refactoring a large procedural method to Dependency Injection

    It's not uncommon when doing Brownfield TDD to encounter legacy procedural code that is doing multiple distinct actions within a single method. Let's go with a hypothetical example:

    "An ASP.NET website has a button_click event handler which does the following:
    a) calls to a legacy COM+ object
    b) calls to a 3rd party licensed DLL
    c) calls to a web service
    d) calls some ADO.NET code to save to a database
    The method is approximately 100 lines of code and is, in its current form, untestable."

    How might you break this down, with some minimal refactoring but without actually changing any of the functionality of the 4 actions within the event handler, to make it testable?

    Here is one possible approach:

    Begin with Refactoring
    1. Do Extract Method refactoring on the event handler to move the code into a seperate method.
    2. Use Extract Class refactoring to move this method to a separate class.
    3. For testability, this logic needs to be in a separate class library, not in the context of an ASP.NET website, so do the following:
         a) create a new project in your solution, of type class library, and name it (eg. Web.Support)
         b) move the new class you have created into this project.
         c) fix any compiler errors by referencing the new class library and then adding a using statement to the code-behind class.
    4. In the new class library, Add References to resolve any compiler errors within the class.
    5. Most typically, this will be a reference to System.Web (plus any custom or 3rd-party references your page was using).
    NOTE   For broken references to Session, use: System.Web.HttpContext.Current.Session
    5. Finally, within this new external method, use Extract Method refactoring to break out the 4 unique pieces of functionality into 4 public methods that can be called separately.

    When you are done, you should have something like this:

    public class MyExtractedClass
    {
         public void MyExtractedButtonClickEventHandler()
         {
              // various parameters declared here

              CallToLegacyComObject(); // each metod will have various parameters
              CallToThirdPartyDLL();
              CallToWebService();
              CallToAdoNetDbSave();
         }
    }


    You are now ready to begin creating your unit and integration tests against a coordinator class. This class will coordinate each of the pieces of above functionality, but in the form of interfaces. Each interface will represent a distinct part of the functionality that can be tested separately. Typically in an ASP.NET (WebForm) web site this coordination is achieved using Model-View-Presenter, where the Presenter is a class that will coordinate the various interfaces. These interfaces are made available to the presenter class by "injecting" each interface into the class as a parameter to the class constructor (hence the term: Dependency Injection.) In this case, you are going to have 5 interfaces injected into the presenter class: one for each unique piece of functionality, plus the view interface.

    Creating the Unit Test
    1. Create two new class library projects:
    • Tests.Unit
    • Tests.Integration
    2. To each project, add references to NUnit.Framework and Rhino.Mocks
    3. Class variables: you being by declaring repository interfaces for each of the functionality elements you need to test. Note that the names of these interfaces should not reflect the technology--for example, IComPlusObjectRepository is a bad name because at the interface level, one does not know whether COM+ will be used as an implementation. Instead, the names of the interfaces should reflect WHAT the functionality business logic does. Let's rewrite the above 4 method calls as pseudo-code, to define WHAT they actually do:

    public class MyExtractedClass
    {
         public void MyExtractedButtonClickEventHandler()
         {
              // various parameters declared here

              // 1. get gym membership fee structure
              // 2. parse and write a PDF invoice
              // 3. register details with national gym organization
              // 4. save gym membership changes to db
         }
    }

    4. Now that you have an idea of what they do, name your repository interfaces names such as:
    • IGymMembershipFeeRepository
    • IPdfInvoiceParserRepository
    • INationalGymRegistrationRepository
    • IGymMembershipRepository
    5. The presenter class: typically you will create one presenter per ASPX page, so it makes sense to use a naming prefix similar to the ASPX page (assuming the ASPX page has a more meaningful name that Default.aspx). Since it appears that the purpose of the original button_click event was to process gym membership fees, you might name your presenter class something like GymMembershipPresenter, with a unit test class name of GymMembershipPresenterTests.cs

    6. In the Web.Support class library, you will now need new sub-namespaces for each of these interface or class types. To do this, create the following folders within the class library:
    • Repository
    • Presenter
    • View
    7. Now we have enough knowledge and infrastructure to create our first unit test in the new project Tests.Unit. The test will make use of interfaces, a presenter, and mocks (mock implementations) to experiment with the interaction design. Let's see what this code might look like (just scan it briefly if you are new to mock objects, then read the explanation below).
    NOTE   We create the unit test BEFORE the interfaces or classes exist, so we won't have Intellisense assistance as we type out these interface or class names as they do not exist yet. The compiler will flag these in Visual Studio by marking them in red. You can then implement these classes in multiple ways:
    • manually
    • make use of the Generate by Usage feature in Visual Studio 2010
    • install a tool like Resharper to enable you to generate these classes more quickly
    [TestFixture]
    public class GymMembershipPresenterTests
    {
        private MockRepository _mockRepository;
        private IGymMembershipFeeRepository _gymMembershipFeeRepository;
        private IPdfInvoiceParserRepository _pdfInvoiceParserRepository;
        private INationalGymRegistrationRepository _nationalGymRegistrationRepository;
        private IGymMembershipRepository _gymMembershipRepository;
        private IGymMembershipView _startTransactionView;

        [SetUp]
        public void SetUp()
        {
            _mockRepository = new MockRepository();
            _gymMembershipFeeRepository = _mockRepository.StrictMock<IGymMembershipFeeRepository>();
            _pdfInvoiceParserRepository = _mockRepository.StrictMock<IPdfInvoiceParserRepository>();
            _nationalGymRegistrationRepository = _mockRepository.StrictMock<INationalGymRegistrationRepository>();
            _gymMembershipRepository = _mockRepository.StrictMock<IGymMembershipRepository>();
            _gymMembershipView = _mockRepository.StrictMock<IGymMembershipView>();
        }

        [TearDown]
        public void TearDown()
        {
            _mockRepository.VerifyAll();
        }

        [Test]
        public void Constructor_FiveRepositoryInputs_ConfiguresGymMembershipAndReturnsMessage()
        {
            const string name = "Sally Wong";
            const decimal amount = 35.00M;
            GymMembership gymMembership = new GymMembership { Name = name, Amount = amount };
            Expect.Call(_gymMembershipFeeRepository.CreateMembershipFee(name)).Return(gymMembership);

            InvoicePdf invoice = new InvoicePdf { GymMembership = gymMembership };
            Expect.Call(pdfInvoiceParserRepository.CreatePdf(gymMembership)).Return(invoice);

            NationalGymInfo nationalGymInfo = new NationalGymInfo { ResponseCode = "<out>some expected xml</out>" };
            Expect.Call(nationalGymRegistrationRepository.RegisterDetails(gymMembership.Name, gymMembership.Amount)).Return(nationalGymInfo);

            var gymMembership = new GymMembership
                                                           {
                                                               Name = name,
                                                               LockerNumber = 352,
                                                               Amount = amount,
                                                               NationalGymInfo = nationalGymInfo
                                                           };
            _gymMembershipRepository.Save(gymMembership);

            _gymMembershipView.Message = "Your membership has been processed.";

            _mockRepository.ReplayAll();

            var sut = new GymMembershipPresenter(_gymMembershipFeeRepository,
                                        _pdfInvoiceParserRepository,
                                        _nationalGymRegistrationRepository
                                                             _gymMembershipRepository,
                                        _startTransactionView);
            sut.CreateNewGymMembership(name, amount);
        }
    }

    Explanation of the Unit Test with Mocks
    For a complete explanation of mock objects, there are many good resources on the web. However, the MAIN purpose of a unit test that uses mock objects is for DESIGN. As you create this unit test, you are designing (experimenting with) possible interactions in the presenter class, using mock versions of the interfaces to speculate what those interface implementations might do, and what values they might return back.

    Typically the unit test consists of the specifying mock behaviors (using the Expect() method of Rhino.Mocks for methods or properties that have a return type), following by the ReplayAll() command, followed by the actual presenter instantiation and method call (see above code snippet for exact details.) The [TearDown] method then calls the VerifyAll() command to validate the specification.

    Once you start to run the unit tests, the mock object framework will validate the specification and point out where the REAL presenter class doesn't yet match the specification you have created with your mocks. This becomes a trial and error process where you keep adding code to the presenter until all of the expectations which you have set up in your unit test have been satisfied by the presenter.

    Why is this important? Why go to all this work to specify the interface interactions within the presenter? Because one you have established a working unit test, you are now in a position to create integration tests where each element can be tested independently.

    Integration Tests
    You can now create an integration test that ONLY tests the behavior of the COM+ object; the rest of the interfaces can be implemented with a "fake" class whose only purpose is to pretend to succeed. This allows you to focus each integration test on the real behavior of a single interaction.

    8. Add a new integration test class to the Tests.Integration class library, named GymMembershipPresenterTests.cs (it will show up under the integration test library so the name can be the same, or different.)

    9. Note the code below. For integration tests, we don't have to use a mocking framework. Instead, we create fake classes, whose only purpose is to succeed happily. The first integration test will simply pass by calling all fake classes.

    [TestFixture]
    public class GymMembershipPresenterTests
    {
        private IGymMembershipFeeRepository _gymMembershipFeeRepository;
        private IPdfInvoiceParserRepository _pdfInvoiceParserRepository;
        private INationalGymRegistrationRepository _nationalGymRegistrationRepository;
        private IGymMembershipRepository _gymMembershipRepository;
        private IGymMembershipView _startTransactionView;

        [SetUp]
        public void SetUp()
        {
            _gymMembershipFeeRepository = FakeGymMembershipFeeRepository();
            _pdfInvoiceParserRepository = FakePdfInvoiceParserRepository();
            _nationalGymRegistrationRepository = FakeNationalGymRegistrationRepository();
            _gymMembershipRepository = FakeGymMemberhipsRepository();
            _gymMembershipView = FakeGymMembershipView();
        }

        [Test]
        public void Constructor_AllFakeRepositoryInputs_ConfiguresGymMembershipAndReturnsMessage()
        {
            const string name = "Sally Wong";
            const decimal amount = 35.00M;

            var sut = new GymMembershipPresenter(_gymMembershipFeeRepository,
                                        _pdfInvoiceParserRepository,
                                        _nationalGymRegistrationRepository
                                        _gymMembershipRepository,
                                        _startTransactionView);
            sut.CreateNewGymMembership(name, amount);

            Assert.AreEqual("Your membership has been processed.", _gymMembershipView.Message);
        }
    }


    10. The SECOND integration test will test ONLY the interaction with the COM+ object. It does this by replacing one of the fake interface implementations with a real interface implementation, in this case, ComPlusCallerGymMembershipFeeRepository class.

        [Test]
        public void Constructor_RealComPlusGymMembershipFeeAndFakeRepositoryInputs_ConfiguresGymMembershipAndReturnsMessage()
        {
            const string name = "Sally Wong";
            const decimal amount = 35.00M;

            _gymMembershipFeeRepository = new ComPlusCallerGymMembershipFeeRepository();

            var sut = new GymMembershipPresenter(_gymMembershipFeeRepository,
                                        _pdfInvoiceParserRepository,
                                        _nationalGymRegistrationRepository
                                        _gymMembershipRepository,
                                        _startTransactionView);
            sut.CreateNewGymMembership(name, amount);

            Assert.AreEqual("Your membership has been processed.", _gymMembershipView.Message);
        }


    11. What goes into the class ComPlusCallerGymMembershipFeeRepository.cs? A call to the ORIGINAL logic which you worked so hard to extract out into an independent class and an independent method:

    public class ComPlusCallerGymMembershipFeeRepository : IParkingLotRepository
    {
        public GymMembership CreateMembershipFee(string name)
        {
            var myExtractedClass = new MyExtractedClass();
            double amountCharged = myExtractedClass.CallToLegacyComObject(name);

            var gymMembership = new GymMembership { Name = name, Amount = amountCharged };
            return gymMembership;
        }
    }


    From here, you can proceed to create 3 more integration tests (with 3 more real implementation classes that call the original logic in the extracted class.) Each integration test will call only one real implementation, and the rest as fakes, allowing you to independently verify the behavior of each, separate action:
    • against the COM+ legacy object
    • against the 3rd party DLL
    • against the web service
    • against the ADONET db layer.
    Conclusion
    So let's review: you STARTED with a button_click event handler containing long procedural code that did 4 completely distinct actions, which you could not test.

    You have ENDED with 4 decoupled interfaces, each representing only one of the actions, and you have the ability to test them independently by implementing each interface, either as mocks in a unit test (to check that your presenter coordinates correctly), as fakes in an integration test (to create pretend success classes for stuff you don't currently care about) or as real implementation classes in an integration test (which actually tests a single, specific action against the original functionality of your legacy code.)
    NOTE   As a final step, you would implement the IGymMembershipView interface on your original ASPX page, and have the button_click event either call directly to the method GymMembershpPresenter.CreateNewGymMembership(name, amount), or via a View event's event handler implementation within the presenter. This is an important final refactoring, so that both your integration tests, and your presentation layer, would be calling the same (tested) code.

    Monday, July 19, 2010

    TDD Kata for DDD (building a simple domain model)

    Overview
    1) The goal of this TDD kata is to build a simple domain model from tests.

    2) The code for the kata is posted here, on github.

    3) It will be based on the user story:
    "A CSR (customer service rep) can manually generate monthly charges for a customer's gym membership."

    4) The following classes will be created as part of the kata.
    Entities:
    • Gym
    • MonthlyPackage
    • Customer
    • Batch
    • Transaction
    Value Objects:
    • Address
    Note how they create three (extremely small) aggregates:
     5) Collection encapsulation:
    Collections should be encapsulated in domain models so that the ability to change collections flows only out of test-driven scenarios. When creating your collections, use the following approach to encapsulate the collections: a private IList<T> field, and a public getter IEnumerable<T> property:

    private readonly IList<MonthlyPackage> _monthlyPackages;

    public Gym()
    {
        _monthlyPackages = new List<MonthlyPackage>();
    }

    public IEnumerable<MonthlyPackage> MonthlyPackages
    {
        get { return _monthlyPackages; }
    }


    6) Each time you are asked to create a test against a DIFFERENT entity, create a new test class, for example:
    • GymTests.cs to test Gym
    • CustomerTests.cs to test Customer
    7) Since equality in a domain model is frequently based on an Id property (such as NHibernate might use to map to an underlying data store), we'll create an EntityBase class to store entity identity.

    Setup
    1) Create a new solution with two projects:
    • Tests.Unit
    • Domain
    2) In the test project, add a reference to the NUnit.Framework.DLL.

    3) Create your first test class, GymTests.cs, and add a using statement for NUnit.Framework.


    TDD Kata for DDD, part 1
    Part 1 is by far the longest part of the kata, but is mostly setup; creating classes, relationships and properties.

    1) Create a test to verify that Gym is an instance of EntityBase
    Note   For each test, I'll provide a code sample. The complete kata is here, on github.
    [Test]
    public void Constructor_NoInputParams_IsInstanceOfEntityBase()
    {
        var sut = new Gym();
        Assert.IsInstanceOfType(typeof(EntityBase), sut);
    }

    2) Verify that two EntityBase instances are equal when both have the same int Id value.

    [Test]
    public void TwoInstances_SameIdProperty_AreEqual()
    {
        const int idToAdd = 9135121;
        var sut1 = new EntityBase { Id = idToAdd };
        var sut2 = new EntityBase { Id = idToAdd };
        Assert.AreEqual(sut1, sut2);
    }

    3) Two EntityBase instances are not equal when each has a different Id value.

    [Test]
    public void TwoInstances_DifferentIdProperty_AreNotEqual()
    {
        var sut1 = new EntityBase { Id = 3819025 };
        var sut2 = new EntityBase { Id = 82934 };
        Assert.AreNotEqual(sut1, sut2);
    }

    4) Two EntityBase instances are not equal when both have a 0 Id value.

    [Test]
    public void TwoInstances_ZeroIdProperty_AreNotEqual()
    {
        const int idToAdd = 0;
        var sut1 = new EntityBase { Id = idToAdd };
        var sut2 = new EntityBase { Id = idToAdd };
        Assert.AreNotEqual(sut1, sut2);
    }

    5) MonthlyPackage is an instance of EntityBase.

    [Test]
    public void Constructor_NoInputParams_IsInstanceOfEntityBase()
    {
        var sut = new MonthlyPackage();
        Assert.IsInstanceOfType(typeof(EntityBase), sut);
    }

    6) MonthlyPackage has a name and price.

    [Test]
    public void NameAndPriceProperties_Set_MatchAssignedValues()
    {
        const string name = "Test Package";
        const decimal price = 35.00M;

        var sut = new MonthlyPackage {Id = 35, Name = name, Price = price};

        Assert.AreEqual(name, sut.Name);
        Assert.AreEqual(price, sut.Price);
    }

    7) Gym has MonthlyPackages collection.

    [Test]
    public void MonthlyPackagesProperty_Getter_HasCountOf0()
    {
        var sut = new Gym();
        Assert.AreEqual(0, sut.MonthlyPackages.Count());
    }

    8) Adding a MonthlyPackage to Gym increments count.

    [Test]
    public void AddMonthlyPackageMethod_MonthlyPackageInput_IncrementsMonthlyPackagesCount(
    {
        var sut = new Gym();
        Assert.AreEqual(0, sut.MonthlyPackages.Count());
        sut.AddMonthlyPackage(new MonthlyPackage());
        Assert.AreEqual(1, sut.MonthlyPackages.Count());
    }

    9) Adding the same MonthlyPackage throws an exception.

    [Test]
    [ExpectedException(typeof(ArgumentException), ExpectedMessage = "You cannot add a duplicate MonthlyPackage.")]
    public void AddMonthlyPackageMethod_DuplicateInput_ThrowsException()
    {
        var sut = new Gym();
        var monthlyPackage1 = new MonthlyPackage {Id = 1535235};
        sut.AddMonthlyPackage(monthlyPackage1);
        sut.AddMonthlyPackage(monthlyPackage1);
    }

    Note   This kind of test is satisfied by putting a guard condition at the beginning of the method. Remember to use "red, green, refactor" to extract each guard condition you create into a meaningfully named static method.
    10) Address MUST have a non-null Street1, City, and Province, or throw an exception.

    [Test]
    [ExpectedException(typeof(ArgumentException), ExpectedMessage = "You must provide a non-null address.")]
    public void Constructor_StreetNullWithCityAndProvince_ThrowsException()
    {
        const string street = "";
        const string city = "Winnipeg";
        const string province = "MB";

        var sut = new Address(street, city, province);

    }

    [Test]
    [ExpectedException(typeof(ArgumentException), ExpectedMessage = "You must provide a non-null city.")]
    public void Constructor_StreetWithNullCityAndProvince_ThrowsException()
    {
        const string street = "1234 Happy St";
        const string city = "";
        const string province = "MB";

        var sut = new Address(street, city, province);

    }

    [Test]
    [ExpectedException(typeof(ArgumentException), ExpectedMessage = "You must provide a non-null province.")]
    public void Constructor_StreetWithCityAndNullProvince_ThrowsException()
    {
        const string street = "1234 Happy St";
        const string city = "Winnipeg";
        const string province = "";

        var sut = new Address(street, city, province);

    }

    11) Two Addresses are the same when they have the same Street1, City and Province.

    [Test]
    public void TwoInstances_SameConstructorInputs_AreEqual()
    {
        const string street = "1234 Happy St";
        const string city = "Winnipeg";
        const string province = "MB";

        var sut1 = new Address(street, city, province);
        var sut2 = new Address(street, city, province);
        Assert.AreEqual(sut1, sut2);
    }

    12) Customer is an instance of EntityBase.

    [Test]
    public void Constructor_NoInputParams_IsInstanceOfEntityBase()
    {
        var sut = new Customer();
        Assert.IsInstanceOfType(typeof(EntityBase), sut);
    }

    13) Customer HAS-A Address.

    [Test]
    public void AddressProperty_Set_AddressEqualsCustomerAddress()
    {
        const string street = "1234 Happy St";
        const string city = "Winnipeg";
        const string province = "MB";

        var address = new Address(street, city, province);

        var sut = new Customer {Address = address};

        Assert.AreEqual(address, sut.Address);
    }

    14) Customer HAS-A MonthlyPackage.

    [Test]
    public void MonthlyPackageProperty_Set_PackageEqualsCustomerMonthlyPackage()
    {
        var monthlyPackage = new MonthlyPackage { Id = 91351 };

        var sut = new Customer {MonthlyPackage = monthlyPackage};

        Assert.AreEqual(monthlyPackage, sut.MonthlyPackage);
    }

    15) Batch is an instance of EntityBase.
    [Test]
    public void Constructor_NoInputParams_IsInstanceOfEntityBase()
    {
        var sut = new Batch();
        Assert.IsInstanceOfType(typeof(EntityBase), sut);
    }

    16) Transaction is an instance of EntityBase.

    [Test]
    public void Constructor_NoInputParams_IsInstanceOfEntityBase()
    {
        var sut = new Transaction();
        Assert.IsInstanceOfType(typeof(EntityBase), sut);
    }

    17) Batch has Transactions.

    [Test]
    public void TransactionProperty_Getter_HasCountOf0()
    {
        var sut = new Batch();
        Assert.AreEqual(0, sut.Transactions.Count());
    }

    18) Adding a Transaction to Batch increments Count.

    [Test]
    public void AddTransactionMethod_TransactionInput_IncrementsCount()
    {
        var sut = new Batch();
        Assert.AreEqual(0, sut.Transactions.Count());
        sut.AddTransaction(new Transaction {Id = 91352, Amount = 10.01M});
        Assert.AreEqual(1, sut.Transactions.Count());
    }

    19) Adding the same Transaction to batch throws an Exception.

    [Test]
    [ExpectedException(typeof(ArgumentException), ExpectedMessage = "You cannot add duplicate transactions.")]
    public void AddTransactionMethod_DuplicateInput_ThrowsException()
    {
        var transaction = new Transaction { Id = 91325125, Amount = 10.01M };

        var sut = new Batch();
        sut.AddTransaction(transaction);
        sut.AddTransaction(transaction);
    }

    20) Adding Transaction with Amount < $10 throws an Exception.

    [Test]
    [ExpectedException(typeof(ArgumentException), ExpectedMessage = "A transaction charge must be at least $10.")]
    public void AddTransactionMethod_AmountLessThanTenDollars_ThrowsException()
    {
        var transaction = new Transaction { Id = 91325125, Amount = 9.99M };

        var sut = new Batch();
        sut.AddTransaction(transaction);
    }


    TDD Kata for DDD, part 2
    Part 2 relies on everything you have created in the first part to create tests which exercise the user story. Once you have completed the kata, you could create additional user stories, and build tests based on the entities you have already established.

    21) Customer can manually generate monthly charge with the Customer.BillForMonthlyCharge(DateTime input) method:
         a) Customer creates a Batch and adds a Transaction to it, assigning package price to Transaction's NetAmount.
         b) after running a new Batch and Transaction record have been created with Transaction.Amount = Customer.MonthlyPackage.Price.

    [Test]
    public void BillForMonthlyChargeMethod_CustomerPackageInput_GeneratesBatchWithTransaction()
    {
        const decimal price = 12.20M;
        var monthlyPackage = new MonthlyPackage { Id = 1235, Name = "Top Fit", Price = price };
        var sut = new Customer { Id = 91352, MonthlyPackage = monthlyPackage };
        var batch = sut.BillForMonthlyCharge(DateTime.Today);
        Assert.IsTrue(batch.TransactionsContainsChargeOf(price));
    }

    22) Adding a manual charge for a Customer from Ontario throws an exception.
    [Test]
    [ExpectedException(typeof(Exception), ExpectedMessage = "A manual charge cannot be run for Ontario customers.")
    public void BillForMonthlyChargeMethod_CustomerIsFromOntario_ThrowsException()
    {
    var monthlyPackage = new MonthlyPackage { Id = 1235, Name = "Top Fit", Price = 9.20M };
    var address = new Address("1234 Happy St", "Toronto", "Ontario");
    var sut = new Customer { Id = 91352, MonthlyPackage = monthlyPackage, Address = address };
    sut.BillForMonthlyCharge(DateTime.Today);
    }

    This completes the TDD kata. However, you can see that this is an obvious jumping off point for writing additional user stories and writing tests to take the domain model further. Try writing at least 2 additional user stories and implementing them as tests.

    [end]

    Tuesday, July 06, 2010

    TDD Kata for decoupling a finicky 3rd party class with Dependency Injection and Mocks

    For a developer who is new to the concept of Dependency Injection, it can be difficult to see the motivation past the theory. A way to make this practical for the developer is to focus on PAIN POINTS.

    One pain point which developers are increasingly encountering is the use of 3rd party DLLs for special functions (eg. for image processing or PDF manipulation), where those DLLs employ strict (finicky) licensing requirements. A typical scenario would be one license for the production server, but a limited or temporary-only license for the development box (or boxes). If a developer has coupled their code by instantiating a third party class directly within their own custom class, they may find themselves at a current or future point unable to run the code on their development machine due to a finicky, frustrating, licensing exception.

    This is a very practical case for the need to decouple their code. When the developer starts to backfill legacy code like this with TDD-based unit tests, this is an opportunity for them to employ DI (dependency injection) and a mocking framework. After their test initially fails with the finicky licensing error, they can update the SUT (their custom class, the "system-under-test") to interact with an abstraction (the interface) rather than directly with the problematic third party class. They can use a mocking framework to substitute a mock implementation that will satisfy the requirements of the call to the 3rd party class.

    This concept can be practiced with a TDD kata that specifically walks through the steps to achieve this. The rest of this blog post demonstrates that kata.
    NOTE   The code demonstrating a completed form of this kata can be found here on github.
    The following TDD kata demonstrates how to decouple a custom class that calls to a finicky 3rd party class, using Dependency Injection and mocks.

    Setup
    1) Create a solution with two projects:
    • Tests.Unit
    • Utils
    2) Add references to NUnit and Rhino.Mocks to your Tests.Unit project.
    3) This is a decoupling scenario, so you want to begin with coupled code. Therefore, create a class, FinickyThirdPartyApp with a method that throws an exception (eg. that its licensing is broken for dev machines)

    public class FinickyThirdPartyApp
    {
        public string DoSomethingProprietary()
        {
            throw new Exception("I'm FINICKY about licensing on dev machines! You can't use me, dev!");
        }
    }

    4) Now create a custom class with a single method that instantiates the third party class, and calls its proprietary method.

    public class FinickyCoordinator
    {
        public string DoMyCustomAction()
        {
            var finickyThirdPartyApp = new FinickyThirdPartyApp();
            return finickyThirdPartyApp.DoSomethingProprietary();
        }
    }

    5) You are now ready to begin.

    The Kata
    1) In the Tests.Unit namespace, create a class, FinickyCoordinatorTests.cs.
    2) Create a test that calls DoMyCustomAction() method and asserts an expected value for the string.
    3) Run the test. It will fail with the licensing exception from the third party app.
    4) Now add Rhino.Mocks to the test class. Create property [Setup] and [TearDown] methods, and mock a new interface, IFinickyWrapper.

    [TestFixture]
    public class FinickyCoordinatorTests
    {
        private MockRepository _mockRepository;
        private IFinickyWrapper _finickyWrapper;

        [SetUp]
        public void SetUp()
        {
            _mockRepository = new MockRepository();
            _finickyWrapper = _mockRepository.StrictMock<IFinickyWrapper>();
        }

        [TearDown]
        public void TearDown()
        {
            _mockRepository.VerifyAll();
        }

        // test here
    }

    5) In the test, change the constructor of your custom class (in this sample code, FinickyCoordinator) to accept IFinickyWrapper as an input parameter (the dependency-injected interface).

    var sut = new FinickyCoordinator(_finickyWrapper);
    var result = sut.DoMyCustomAction();

    result.ShouldEqual(someValue);

    6) Finally, begin the test by specifying the mock expectations (the call to the interface wrapper method, and the expected returned string).

    [Test]
    public void DoMyCustomActionMethod_NoInputParams_ReturnsExpectedString()
    {
        const string someValue = "Some value returned";
        Expect.Call(_finickyWrapper.DoSomethingProprietary()).Return(someValue);

        _mockRepository.ReplayAll();

        var sut = new FinickyCoordinator(_finickyWrapper);
        var result = sut.DoMyCustomAction();

        result.ShouldEqual(someValue);
    }

    7) Run the test, which will fail.
    8) Now correct the code within FinickyCoordinator to match the dependency injection.

    public class FinickyCoordinator
    {
        private readonly IFinickyWrapper _finickyWrapper;

        public FinickyCoordinator(IFinickyWrapper finickyWrapper)
        {
            _finickyWrapper = finickyWrapper;
        }

        public string DoMyCustomAction()
        {
            return _finickyWrapper.DoSomethingProprietary();
        }
    }

    9) Run the test, and verify that the test is passing.
    10) Finally, create an implementation class which actually calls to the 3rd party class (but will no longer be called by the unit test.)
    public class ThirdPartyFinickyWrapper : IFinickyWrapper
    {
        public string DoSomethingProprietary()
        {
            var finickyThirdPartyApp = new FinickyThirdPartyApp();
            return finickyThirdPartyApp.DoSomethingProprietary();
        }
    }

    The kata is complete.

    Saturday, July 03, 2010

    Quick Find Algorithm (from Sedgewick) in C# using TDD

    In "Algorithms in Java", by Robert Sedgewick, available on Amazon.com here, chapter 1 explores a connectivity algorithm in increasingly complex iterations.

    The goal of the connectivity process is as follows:
    1. be able to add pairs of connections as integers (2-3, 5-1, 8-7).
    2. The connections are transitive, so adding 2-3, 3-5, and 5-7 menas that 2-7 is also connected.
    3. Once a transitive connection exists, adding the direct connection (2-7) is redundant and therefore ignored.
    MY goal in working through these algorithms is to use Test-Driven Development in C# to solve and evolve them.

    Starting from the initial description of the connectivity process, I created a series of tests against a utility class that added connectivity pairs. Each time, before adding them, the utility class checks to see whether a transitive connection can be established across the already existing pairs in an in-memory array. This worked, and all tests were passing (for a very simple case.)

    However, in reading further, I found that Sedgewick points out that while this is the typical first approach taken, it has significant problems:
    "First, the number of pairs might be sufficiently large to preclude our saving them all in memory
    in practical applications. Second, and more to the point, no simple method immediately suggests itself for determining whether two objects are connected from the set of all the connections, even if we could save them all!"
    (The book is excellent and I recommend reading it directly to get the full account.)

    From here, Sedgewick works through a series of iterative algorithms, each coming closer to the complete solutions.This approach dovetails nicely with the principle in Test-Driven Development of:
    "Start by building the simplest thing that could possibly work."
    For example, in the TDD Calculator kata, this might mean that you solve your first test by returning 0 (hard-coded) when an empty string is passed.

    In the case of this connectivity algorithm, first pass, the Quick find approach is the simplest thing that could possibly work:
    For each pair you add, (for exampe: 4-9) OVERWRITE the value on one side to be the same value as the other side.
    For example, if you started with an array like this:

    new int[] { 0, 1, 2, 3, 4, 5, 6, 7, 8, 9 };

    By the time you were done (all connections established), where the last input pair were, let's say, 7-1, the array would look like this:

    new int[] { 1, 1, 1, 1, 1, 1, 1, 1, 1, 1 };


    Does this solve every connectivity issue? No. But neither does returning 0 in Calculator kata; it is simply the
    first, simplest thing that works.

    Having read Sedgewick's explanation for Quick Find, I decided to start by building the Quick Find algorithm as a series of unit tests. As you read through the unit tests in order (here on github), they document the progression through variations until all Quick Find connectivity add requirements are satisfied.

    In the QuickFinder class itself, I would normally refactor without preserving previous iterations. However, for
    documentation purposes, to trace the steps that got us here, I have kept (commented out) the previous iterations.
    NOTE   To see how the tests failed/evolved across versions, try uncommenting an earlier iteration.
    As I proceed further into Ch.1 of Sedgewick, additional iterations of the algorithms will be introduced. Time-permitting, my goal is to created each of these algorithms using TDD as well, and post them to github.

    Thursday, June 24, 2010

    All kinds of Repository implementations

    I've been looking back and reviewing the approaches on some of my previous projects. In particular, I've been going back to review a project I did in 2005. At that point, I didn't really have the concepts of domain model and repository clear: for data access I was using POJOs, but loading them internally, within each POJO, via a private method (which called to stored procedures with parameters using SqlDataReader.)

    In all projects since, I've used  a Domain Model and Repository, typically with NHibernate for the ORM mapping/queries.

    As I started using Rhino Mocks, I also created mock repositories for MVC and MVP unit testing. And I also have created fake repositories (returning collections of dummy objects), and LinqToSql repositories as part of the PRO ASP.NET MVC book examples [Sanderson].

    The only combination I hadn't done was original ADO.NET/SqlDataReader in a repository.

    In the following code sample, I add an ADO.NET repository to an Model-View-Presenter scenario (which originally had only mocked repository and view interfaces against a Presenter). To make a complete integration test:

    1) I create a view interface implementation (WinForm) where the List<Project> setter property assigned its value to a simple data grid
    2) I create an AdoNetProjectsRepository implementation class where List<Project> FindAllProjects() method returns a list of Projects from the database.

    Integration test with Form1.cs and ADO.NET Repository

    [TestFixture]
    public class ProjectsPresenterIntegrationTests
    {
        [Test]
        public void ShowProjectsEvent_Raised_RetrievesProjectsFromRepositoryAndAssignedToViewProjectsDisplay()
        {
            IProjectsRepository adoNetProjectsRepository = new AdoNetProjectsRepository();
            var projects = adoNetProjectsRepository.FindAllProjects();

            IProjectsView projectsView = new Form1();
            projectsView.ProjectsDisplay.ShouldEqual(projects);
        }
    }


    IProjectsView implementation as WinForm

    public Form1()
    {
        InitializeComponent();
        IProjectsRepository adoNetProjectsRepository = new AdoNetProjectsRepository();
        var projectsPresenter = new ProjectsPresenter(adoNetProjectsRepository, this);
        ShowProjects(this, EventArgs.Empty);
    }

    public event EventHandler ShowProjects;

    public List<Project> ProjectsDisplay
    {
        get
        {
            return (List<Project>)dgrProjects.DataSource;
        }
        set
        {
            dgrProjects.DataSource = value;
        }
    }


    Projects Presenter

    public class ProjectsPresenter
    {
        private readonly IProjectsRepository _projectsRepository;
        private readonly IProjectsView _projectsView;

        public ProjectsPresenter(IProjectsRepository projectsRepository, IProjectsView projectsView)
        {
            _projectsRepository = projectsRepository;
            _projectsView = projectsView;
            _projectsView.ShowProjects += new EventHandler(ProjectsViewShowProjects);
        }

        private void ProjectsViewShowProjects(object sender, EventArgs e)
        {
            _projectsView.ProjectsDisplay = _projectsRepository.FindAllProjects();
        }
    }


    ADO.NET Repository

    public class AdoNetProjectsRepository : IProjectsRepository
    {
        public List<Project> FindAllProjects()
        {
            var projects = new List<Project>();

            PopulateProjectsWithSqlDataReader(projects);

            return projects;
        }

        private static void PopulateProjectsWithSqlDataReader(ICollection<Project> projects)
        {
            SqlDataReader sqlDataReader = null;

            try
            {
                var sqlConnection = new SqlConnection(DBManager.DBConnection);
                var sqlCommand = sqlConnection.CreateCommand();

                sqlCommand.CommandText = DBManager.DBOwner + "sp_getCurrentProjects";
                sqlCommand.CommandType = CommandType.StoredProcedure;

                sqlConnection.Open();
                sqlDataReader = sqlCommand.ExecuteReader(CommandBehavior.CloseConnection);

                if (sqlDataReader == null) return;

                while (sqlDataReader.Read())
                {
                    var myProject = new Project
                    {
                        ProjectId = Convert.ToInt32(sqlDataReader["ProjectID"]),
                        Name = sqlDataReader["Name"].ToString(),
                        ProductName = sqlDataReader["ProductName"].ToString()
                    };

                    projects.Add(myProject);
                }
            }
            finally
            {
                if (sqlDataReader != null) sqlDataReader.Close();
            }
        }
    }


    The conclusion I drew from this experiment: while I am accustomed to (and may prefer) to use an ORM tool like NHibernate to do my query retrievals in a repository, it is by no means my only option. Even plain old ADO.NET SqlDataReader can do the trick.

    The primary goal is not which data access implementation to use, but instead the abstraction of the Domain Model, Repository, and application services (controller/presenter/web service).